Follow Me on Feedly RSS Feed Email Me Follow Me on Instagram Follow Me on Pinterest Home Finished Projects Recipes Nail Art About Me Who's That? Image Map

Thursday, May 30, 2013

My Fur Babies Settling In

Howdy!

My fur babies are settling in nicely, but really don't appreciate all the noise that their Daddy had to make to get the surround sound hooked up and all the wires run inside the walls. lol


Tuesday, May 28, 2013

Reversible Beach Bag

Howdy!

T is graduating from 8th grade this today.  We are all so proud of how hard she has worked to improve her grades this year.  This past weekend she had her 8th grade trip to Splashtown (a Texas waterpark).  She was in need of a big over-the-shoulder bag that coordinated with her new coral, white, and black bathing suit.  Enter my need to sew for everyone.

Mama helped me a little with this project, since I had no real pattern and we wanted to pleat the top.  The bag is completely reversible.  And, as she requested the straps are ungodly long, so as to hit her on the hip.

You can see below that it holds quite a bit!  Her shoes, a couple of towels, sunscreen, hair stuff, a change of clothes, sunglasses,  baggies for the wet suit after, and all the other odds and ends that you need for a day trip to the waterpark.


It really turned out wonderfully, unlike the original I did before Mama got there.  That one resembled a papoose with straps that were way to long.  Unfortunately, we got so caught up in making a new one, we forgot to take a picture of the mistake bag before we took it apart for the straps. lol  Oops, my bad!  Just know that we all screw up, even when we think we know what we're doing.

Sunday, May 26, 2013

Embroidery Floss Storage

Howdy!

Awhile back I saw someone on Pinterest storing their embroidery floss using clothespins.  When I saw this I realized how ingenious it was.  Clothespins are cheap and easy to come by and they store beautifully.  So before the move I decided to convert all of my opened floss to clothespin storage.

The original Pinterest Pin stopped at winding the floss on the clothespins, but the worst part of having opened floss is that if you run out during a project and need more of a specific color you're pretty much up a creek without a paddle.  So, I trimmed up the bands I had saved from freshly opened skeins, slid them, on the ends, and taped them down.  Now I have ingenious storage and I know the color number if I need more of that color (or just love it, like the one to the right).

Friday, May 24, 2013

The Cherry on Top

Howdy!

Something I'm loving about San Antonio so far is all the fresh produce!  I found these delicious cherries at my neighborhood HEB.  I'm devouring these fresh, but I'm hoping that I can get to can some soon.  First I have to finish unpacking everything though :/  I'm not letting myself indulge in canning or crafting until the house is in order - the only thing I'm letting myself do is the Baby Quilt during relaxing time.

Do you have a favorite summertime fruit?

Wednesday, May 22, 2013

Sew Attracted

Howdy!

I mentioned in this post a few tools I found incredibly helpful, if not vital to my hand piecing project.  I now have another!  Mama gave me a magnetic wristband my Dritz that she found at a thrift store for practically nothing.  It was on some horribly uncomfortable and pretty much useless Velcro that kept falling off (sorry no picture of that, Ducky confiscated it to play with immediately lol).  So I took my happy butt to Wal-Mart and got a kids sized sweatband from the sports department and super glued that baby to it.  And the angel chorus proclaims its glory.  Now I have a comfortable and convenient wristband for holding on to my needle or helping me if I drop it :)

Monday, May 20, 2013

Hexie's To Go!

Howdy!

I have officially moved!  San Antonio here I am!  And, since I had to pack everything down, I made a little hexie travel tin :)  I found a 6" circle tin that is about 2 1/2" deep at a local resale store for a quarter.  It's perfect!  I was able to put several of each fabric hexie, a couple of cloth hexie's folded to hold my needle, my magnet wrist band, my scissors, my Thread Heaven, a spool of thread, and some extra needles.  It worked perfectly for the move, both around the house during the down time of packing, in the car, during the ongoing unpacking, everything.  Definitely recommend a travel kit of some sort when moving about whether you're actually moving, traveling, or just running around in everyday life.  I would love to see your travel kits :)


Monday, May 13, 2013

Basting Success!

Howdy!

Shortly after I posted about my Baby Quilt WIP, I decided that now that my need to see the quilt actually started  was satiated I should finish basting all my little hexies.  So, I grabbed a shoe box (which will be made pretty with fabric once we get moved and my spray adhesive is unpacked), lined it, and started basting away.  Technically I didn't baste all my little hexies... The brown fabric with the pretty polka dots in the bottom right hand corner of the picture is a twill and caused some irritation (I will have a post regarding how I dealt with it soon).  As such, there will not be many of these guys in the quilt.  The back row of hexies in the picture is little more tightly packed than the others, so really there's about half a row of each except for the twill, the yellow, and the bluey color in the back.  Do I think that I will need all of these?  I have no idea. Honestly, I may actually be needing more if I did my math correctly.  We shall see :)

The leftover hexies that must find a new destiny :(

Saturday, May 11, 2013

Yummy Pie

Howdy!

I was jonesin' for something sweet and creamy with caramel and chocolate the other day, so what did I do?  Start rummaging around my kitchen!
(For the record in my throwing this and that together I ended up with a massive amount of this stuff.  Enough for a 9x13" pan.  I divided mine so that I could take most of it to some friends.)

I started by making a graham cracker crusted with chopped pecans throughout, pressing it into the pan, and baking at 400¡.  I used about 2 ½ cups (216g) of graham cracker crumbs, 1 ¾ cups (208g) finely chopped pecans, and 1 ½ sticks of melted butter.


Next I made my caramel.  Melt 2 sticks of butter with 8 oz (227g) by weight of brown sugar (forgot to get a cup measure :/ sorry) on medium low heat.  Once the sugar is dissolved, add to cans of sweetened condensed milk.  Stir this constantly (near the end is much more important that at the beginning) until you get a nice caramel color (basically as long as you can stand to stir the darn thing).  Let it cool just a bit and then pour and smooth it over your cooled crust.
(Next time if actually plan to make this dessert, I will use this method instead)


I cheated on my chocolate layer and used a large box of instant pudding mix.

Lastly, I made homemade whipped cream with heavy whipping cream, vanilla, sugar, and cream of tartar (cream of tartar is essential to your whipped cream surviving and not turning into a sweetened cream mess after a few hours).  Obviously I got impatient and didn't wait for my pudding to set up completely, so it didn't turn out as pretty as most of my creations... BUT it was GOOD!

Thursday, May 9, 2013

Spiced Pickled Pears

Howdy!

When I started canning the first thing I did was tackle my great-grandmother's Spiced Pickled Pears (a family favorite, especially of my father's, that I never got to try - just hear about my ENTIRE life).  Of course, it wasn't a full recipe, just a list of ingredients.  So, I did a bit of general canning research and came up with the attached recipe.

The longer you can stand to let the pears sit after canning the better.  Mama says that you should always put them up for at least a month.  Note that it is VERY important to use WHOLE spices.  Don't ask how I know...

You can use these for anything you like, but in my family it is traditionally found in a delicious cobbler that is simple and great for dessert or breakfast and never lasted long in our house when I was growing up.  I have attached this recipe, as well.

I truly love family recipes, especially ones from family member that I have only heard about.  They make me feel as if I am getting to know them :)  I am working on a project of going through hundreds, probably thousands, of recipes from my grandmother and great-grandmothers on my mother's side (from where these recipes hail) and compiling and indexing them for future generations.  Then I plan to preserve the originals.  Eventually, I would love to publish a cookbook. :)
Download this picture and print it on an index card.  It is formatted for the proper dimensions of a 3x5 or 4x6 card.

Download this picture and print it on an index card.  It is formatted for the proper dimensions of a 3x5 or 4x6 card.

Tuesday, May 7, 2013

Some More Hexie Tips


Howdy!

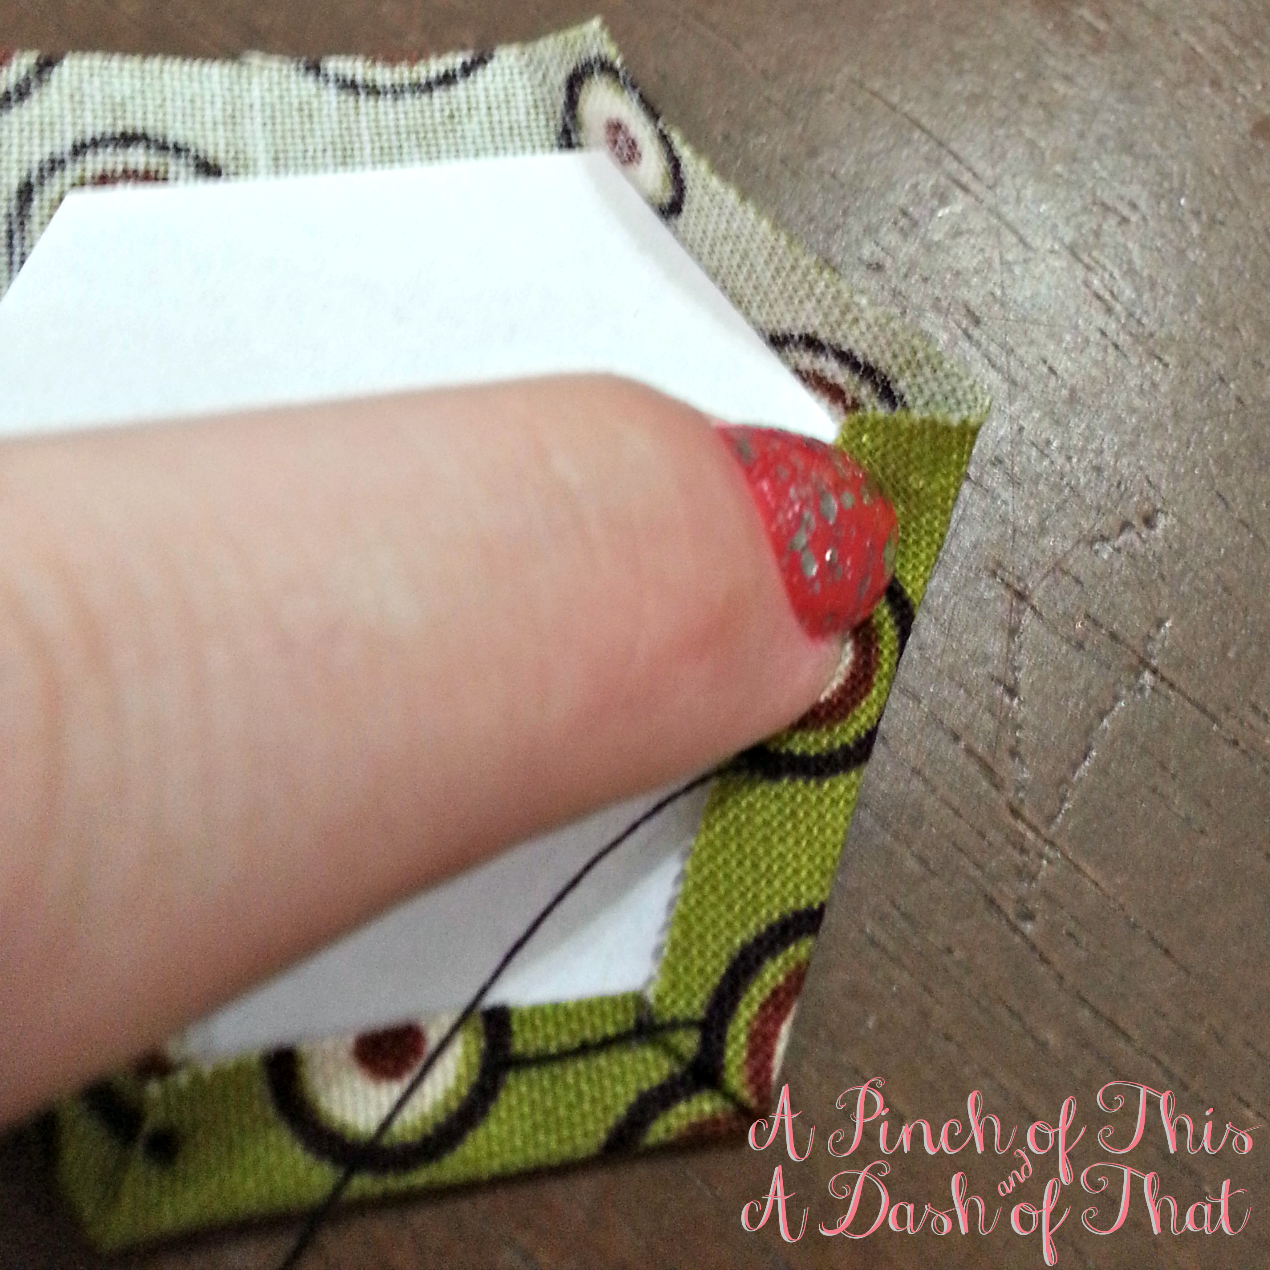
As you saw in my last post, not all of the really cute polka dot hexies got basted for the baby quilt.  Why?  Because, twill is NOT ideal for this application.  Live and learn, right?  Well I do have a little trick for you if you decide to torture yourself for an adorable print, too.

Start out as usual, but then come back up on the outer side of the fold a little closer to the edge of the hexie.  You want to be close to the fold, but not catching any threads of it.  Go down either in the original hole as shown below or near it.  The goal is hold down the fold securely.  


Make sure that when you are sewing other hexies to your twill hexie you have the twill hexie facing you.  Otherwise it will fray as you can see below.  Fraying will also occur if you let your working thread get caught on the seam allowance, which is what actually happened below but the effect is the same as not sewing the correct direction.

One last thing - when you go to remove your paper from the twill hexies, take care to really pull out your stitches before the paper, otherwise you will tear the paper.

Sunday, May 5, 2013

Never Enough Pincushions

Howdy!

As you know, I am a novice sewer, therefore am in the process of acquiring all the necessary, and unnecessary, supplies and tools for the craft.  Thanks to Mama I have much of the essential things, but I have found that I am constantly needing a pincushion!  

I found this tutorial by Kim at My Go-Go Life.  Since I am considering using the Cathedral Window pattern when I make a quilt for my parents (Mama's requested Christmas present lol), I decided pincushions would be a great way to practice :)  I highly recommend Kim's tutorial.  I didn't have a bit of problem following along and the results are gorgeous (and very functional), don't you think?  I filled mine with rice, since it's ultra cheap and I like pincushion it creates more than batting (plus no shedding).  I followed the tutorial to a tee on the first one (back button not being a shank-style button excepted), but on the second one I didn't do a seam on the backing (not the easiest place to fill the pincushion when using rice), instead I left a small hole on side for turning and filling and then used the same ladder stitch to close it up in the end.  I love both of them :)


If you make one, please share!  Also, Kim has a Flickr Group set up for sharing, as well, so that she can see.


Thursday, May 2, 2013

Hexie Tip

Howdy!

In doing hundreds of hexies for this baby quilt that I'm working on I have discovered a tip in creating an even seam allowance all the way around.


Starting by finger pressing two opposite sides at the same time, preferably with the grain.


From here just make your folds and basting stitches as described in my previous post, making sure to line up by pressing your first sides periodically.


When you get to the opposite side from your start, lift up that side and make your fold (I'm slightly OCD and like all of folds going the same way), and continue around following the same pattern.


Look at that beautiful hexie!  Quick, easy, and nicely symmetrical :)

If anything wasn't clear please let me know and I will clarify.  And, if you're working on a hexie or English Paper Piecing quilt, I would love to see it!

Wednesday, May 1, 2013

Bright & Sparkly

Howdy!

I've been rather under the weather as of late, so I decided to perk myself up with a nice manicure.  Life is always more fun when you sparkle ;)
I started with my go to coral - a nice bright springy/summery coral by Essie called e-nuf is e-nuf.  Then I layered Essie Luxeffects Set in Stones over the top and of course finished it all off with a generous layer of Seche Vite.
Summer here I come!  What's on your nails?  Are manicures therapeutic for you, too?


Precuts Demystified

Howdy!

For those of you wondering about precuts, they fall into a couple of categories.


  1. Charm Packs - packs of (usually) 40-42 coordinating 5" squares. All from a particular line of fabrics, usually one square of each from the line.
  2. Layer Cakes - same as Charm Packs, but 10" squares instead of 5" squares.
  3. Jelly Rolls - 2.5" strips the WOF (width of the fabric), again in coordinating fabrics from a line or color palate.
  4. Honey Bun - same as Jelly Rolls, but 1.5" strips.
  5. Dessert Rolls - same as Jelly Rolls, but 5" strips.
  6. Turnovers - same principle as the Charm Packs and Layer Cakes, but in a 6" triangle.
*All of these are also sold in solids or stacks/rolls of one solid color, e.g. white.*

This page from Minnesota Charms has loads of Precut Math already worked out for you if you're making a quilt, or want to make your own precuts. :)
Related Posts Plugin for WordPress, Blogger...