My house is quite again (my wonderful in-laws were visiting this week taking up my attention), so can now update you on progress. I finished my class project! It originally had a border, but the back piece was too small. So, I just cut the border off and moved on. I really like how it came out :) (Please excuse the crappy picture. It was taken in a hurry while MIL and FIL were still here. Also, Ducky just had to part of the picture no matter how much I coaxed). I can't wait to show all the ladies!
I was running out of hexies in a couple colors, so unfortunately I am back to basting :/ But! I am using the "flowers" I have done to start "squaring up" the freeform beginning. That way I really have the beginning of a quilt - and, the pile was getting a little large for my box lol Pictures of that soon :)
I am also looking forward to doing my Quilts for Kids (Q4K) project and starting my City Sampler Quilt at The Scrappy Quilter this week. It should be a week full of quilting goodness :)
Shortly after I posted about my Baby Quilt WIP, I decided that now that my need to see the quilt actually started was satiated I should finish basting all my little hexies. So, I grabbed a shoe box (which will be made pretty with fabric once we get moved and my spray adhesive is unpacked), lined it, and started basting away. Technically I didn't baste all my little hexies... The brown fabric with the pretty polka dots in the bottom right hand corner of the picture is a twill and caused some irritation (I will have a post regarding how I dealt with it soon). As such, there will not be many of these guys in the quilt. The back row of hexies in the picture is little more tightly packed than the others, so really there's about half a row of each except for the twill, the yellow, and the bluey color in the back. Do I think that I will need all of these? I have no idea. Honestly, I may actually be needing more if I did my math correctly. We shall see :)
The leftover hexies that must find a new destiny :(
As you saw in my last post, not all of the really cute polka dot hexies got basted for the baby quilt. Why? Because, twill is NOT ideal for this application. Live and learn, right? Well I do have a little trick for you if you decide to torture yourself for an adorable print, too.
Start out as usual, but then come back up on the outer side of the fold a little closer to the edge of the hexie. You want to be close to the fold, but not catching any threads of it. Go down either in the original hole as shown below or near it. The goal is hold down the fold securely.
Make sure that when you are sewing other hexies to your twill hexie you have the twill hexie facing you. Otherwise it will fray as you can see below. Fraying will also occur if you let your working thread get caught on the seam allowance, which is what actually happened below but the effect is the same as not sewing the correct direction.
One last thing - when you go to remove your paper from the twill hexies, take care to really pull out your stitches before the paper, otherwise you will tear the paper.
In doing hundreds of hexies for this baby quilt that I'm working on I have discovered a tip in creating an even seam allowance all the way around.
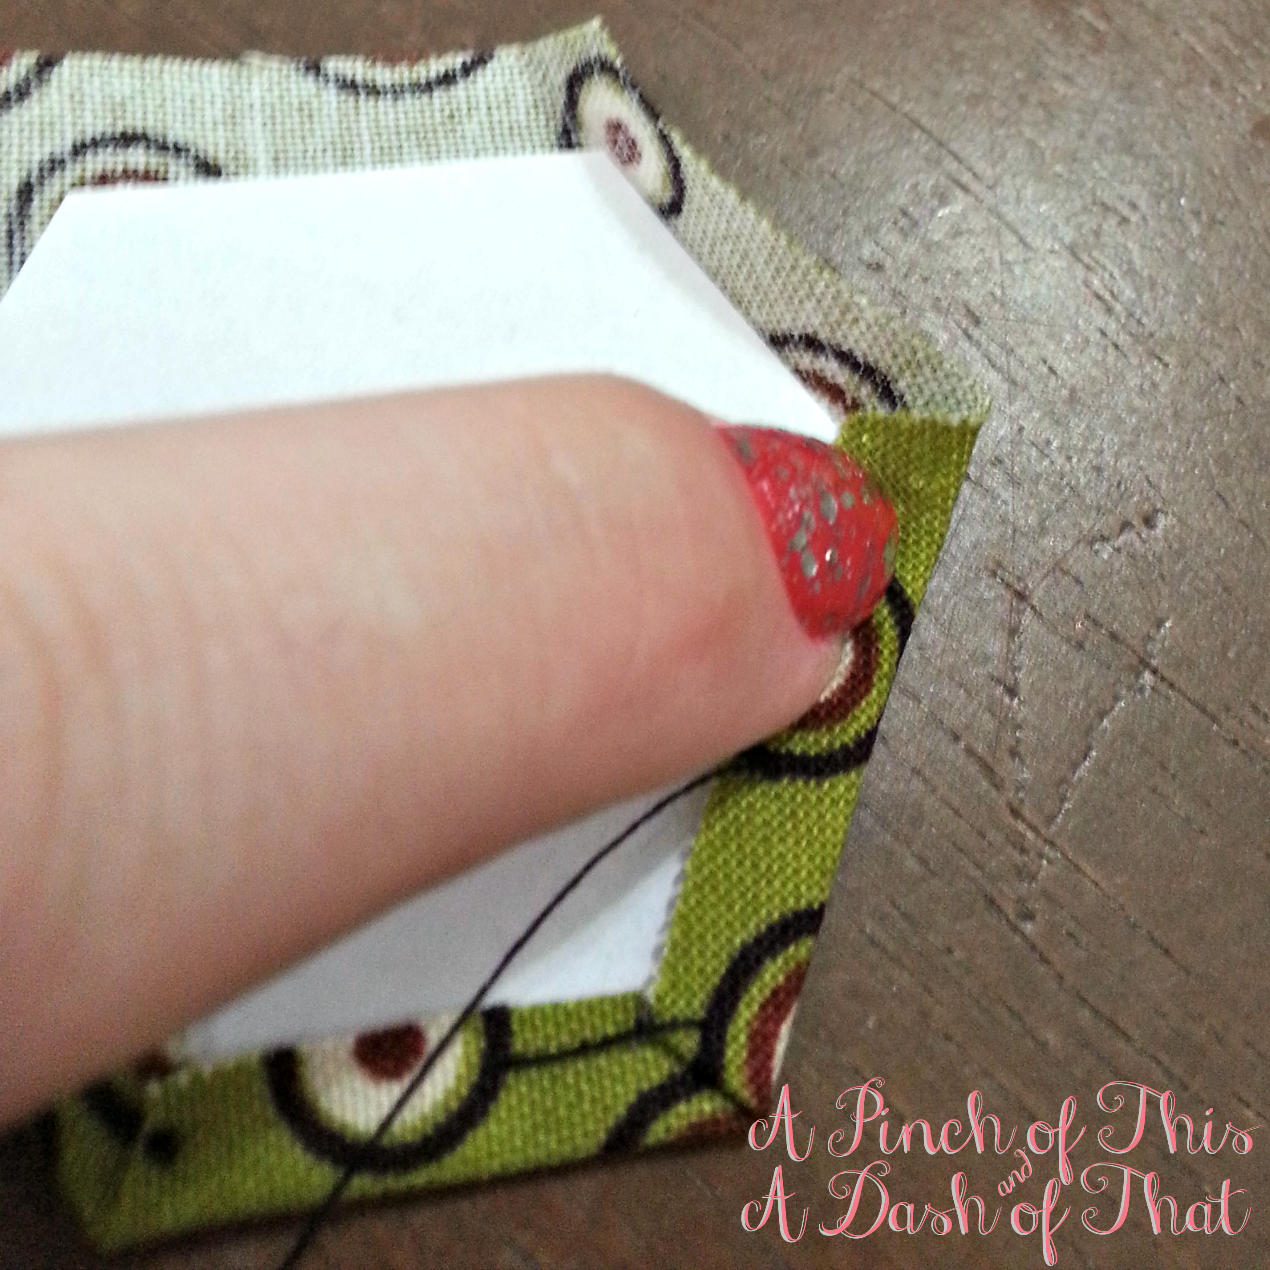
Starting by finger pressing two opposite sides at the same time, preferably with the grain.
From here just make your folds and basting stitches as described in my previous post, making sure to line up by pressing your first sides periodically.
When you get to the opposite side from your start, lift up that side and make your fold (I'm slightly OCD and like all of folds going the same way), and continue around following the same pattern.
Look at that beautiful hexie! Quick, easy, and nicely symmetrical :)
If anything wasn't clear please let me know and I will clarify. And, if you're working on a hexie or English Paper Piecing quilt, I would love to see it!
I mentioned in an earlier post that I had started a second quilt. I actually started it shortly after the first so that I would have a portable project, as well (Hubby and I were going to his parents' that weekend). Coincidentally, some good friends of our just found out they are expecting :) So, what better portable project than a baby quilt! Since we don't know if the baby is a boy or girl yet, I wanted to stay pretty neutral. Also, due to the fact that I was looking for portable it had to be hand piecing, which lead me to English Paper Piecing (tutorial at the end of this post), for which hexagons (or hexies) are the most common shape.
First, come the papers. I started with these templates in the 1" size. I didn't have much success cutting as she instructed, though. For me printing the template and gluing a stack across the top and then cutting along the lines in vertical strips gave me the most accurate hexies. Be sure not to cut into your glued area. It's important for keeping things aligned properly. Also, don't get in a hurry. These papers are the foundation for your entire quilt, so spending a little extra time on them in the beginning will result in less headache and a much more beautiful finished product later. I cut just over a thousand in a relatively short amount of time. I used just regular computer paper and have been happy with the results, but you could also use cardstock or freezer paper, too. Don't forget you can reuse your papers. I would recommend ironing them before another round as you can see they get folded a bit in the piecing process.
Next step is cutting your fabric hexies. I really liked the method in the tutorial at the end of the post. I used a little piece of tape on the back of a paper and then used a 4.5x4.5" grid ruler to add a 1/4" seam allowance on all sides. The picture to the left is what I currently have left from what I have cut. Again, since I was cutting multiple layers of fabric, this didn't take long once I got a rhythm.
Next comes basting, which means that you attach the fabric hexies to the papers with a temporary, contrasting stitch to create seam and provide stability. You can tape, glue, or pin the paper down if you like, but I found just firmly and carefully holding the paper was easiest for me - less time, hassle, and stuff involved. As the tutorial at the end states, you don't need a knot at the end of the basting since you're going to pull the stitches out. By the way, use the removal method in the tutorial because it works and has no headache involved. Can you tell I like this tutorial? lol
I couldn't wait to baste everything before I started to sew my little hexies together. I just couldn't stand it, I had to see my fabrics together and be able to show off to Hubby (he likes to see periodic progress, otherwise he doesn't believe when I say things are coming along lol). So, here is an unpressed snapshot of the WIP. What do you think?
I have found a few tools highly valuable in this process. One, Thread Heaven - a thread conditioner. DO NOT hand sew without it. It is cheap (I paid $3.99+tax for it) and it will save you immense amounts of time, headaches, and money in liquor. Two, a thimble for my thumb. I push with my thumb for the whip stitch and it was getting really sore. I really like this leather one, called Nimble Thimble (I think), because it fits my finger nicely, it has an opening for my fingernail (I tend to keep them long if you haven't noticed my Nail Art Tab), and most importantly I can still grip the needle really well. The last thing are these wonderful little snips that I picked up from Joann's for super cheap; they are perfect for getting close to the work, ergonomic, and travel well.
I am finding that I am truly enjoying the hand stitching, especially when I am not feeling well. I find it incredibly relaxing and rewarding. What do you tend to do for stress relief?
As I have mentioned in a previous post I have been bitten by the sewing bug. Hard. I have actually sewn everyday since I received my sewing machine. :) I don't know why, but quilting has caught my fancy. So I started researching quilting and talking to my mom (an amazing sewer) about it. Apparently I come from a very long, prestigious line of quilters on both sides of my family. So, I started a quilt. I began the quilt with these block patterns in mind, a couple of charm packs in Papillion by Moda, and a little bit of yardage in complimentary brown. I really do love it, unfortunately my cutting skills have not proven up to the task to all of these points :( My Scrappy Four Patches are pretty, but far from perfect. So, instead of doing a Four Patch with and X block. I think I am going to change my game plan to a Scrappy Four Patch with sashing and a border, which means this will probably go on the back burner until I get a hold of some sashing fabric. But, I do have another quilting in progress that I will be sharing with you very soon. Until then...


 My house is quite again (my wonderful in-laws were visiting this week taking up my attention), so can now update you on progress. I finished my class project! It originally had a border, but the back piece was too small. So, I just cut the border off and moved on. I really like how it came out :) (Please excuse the crappy picture. It was taken in a hurry while MIL and FIL were still here. Also, Ducky just had to part of the picture no matter how much I coaxed). I can't wait to show all the ladies!